Showing posts with label garlic. Show all posts

Wednesday, May 7, 2014

Pickled Broccoli Stalks with Ginger & Red Onion

Some days, when I'm not feeling particularly flush, the price of fresh vegetables I buy just astounds me. I buy organic, for both my health, and because I feel we vote with our dollars even more than our actual votes. But the price of a head of organic broccoli set me back on my heels a bit last Saturday. OK, granted, it was at Whole Foods, and for whatever reason, their organic produce is more expensive, for the most part than it is at my local Wegmans, but I was there for something else, so I bought it. I was thoroughly wishing my garden was producing at top speed. 

After using the top third of the broccoli head in a recipe, I put the big stems back in the fridge, figuring at the price, I'd peel them for a stir-fry. Busy week, no stir fry. As I was cleaning the crisper out for a "Scrap Salad" for lunch, I figured, I should do something with the broccoli stems that would be good, really good. Love them pickled. But as I reached for my usual Mediterranean seasonings, I took a turn East.

There were more but I ate 4 pieces trying to take a picture...

Pickled Broccoli Stalks with Ginger  & Red Onion

Four (4) thick broccoli stems, florets used elsewhere
1/3 cup red onion, in  1/4" slices
3/4 cup rice wine vinegar
3/4 cup water
3T organic sugar
3 garlic cloves, minced
2" fresh garlic, peeled and minced
1T coriander seed
3T kosher salt
1 pinch red pepper flakes


Peel the broccoli stems and cut into 2" long x 14" thick sticks. Bring a small pot of hot water to the boil and blanch the broccoli stems for 3-4 minutes until just barely tender. Drain well, and place in a heat-proof bowl. Add the raw onion to the hot broccoli and stir.

Bring the remaining ingredients to a boil in a small saucepan, and stir until the salt and sugar have dissolves. Remove from the heat, cover and let stand for 5 minutes off the heat.

Pour the seasoned brine over the broccoli and onions, and let stand 15 -20 minutes until cooled to warm, and then cover and chill. Best served chilled, and even better each day late. keeps about a week, though you'll eat it all before that...for sure.


Wednesday, October 16, 2013

Garden Report: Garlic Planting Day

Wow. Here it is, officially past the middle of October, and normal people are starting to think about Halloween, Thanksgiving, and the upcoming Winter holidays, and I am thinking about Spring. If I want to have garlic scapes and garlic bulbs to pull from the garden next Summer, then I need to get my garlic bulbs in the ground now, a few weeks before the ground begins freeze.

If I wasn't so lazy, and didn't use my phone to take the picture, you'd know I planted Red German  hardneck garlic that I bought from Territorial Seed Company at the end of the Summer. Put 80 cloves into the ground and with much hope, luck...and some weeding and fertilizer, I should have 80 nice, fat garlic bulbs next year. Has worked every year for the past 10. Some types of garlic need to be chilled in order to produce a bulb. Learned THAT lesson the hard way.

I planted using the square foot method, used my trusty dibble to make holes about 3" deep and dropped a clove (root end down) into each hole spaced about 5" apart. Covered the holes with soil, watered well, and when we get close to a frost (usually around Halloween), I'll mulch the garlic bed with a few inches of straw in case we have a really harsh winter here in the Philly 'burbs.

It does seem a little funny planting for Spring, since my peppers, chard and tomatoes are still producing, but I know in a couple of weeks, I'll have yanked out all the dead plants and will be dreaming again of Spring. After all, it's only 155 days away.

Garlic, ready to plant for Summer 2014!


Monday, August 12, 2013

Meaty Monday: Far East Five Spice Pork in the Crock

All of a sudden, its gone from too hot and humid to strangely cool and Fall-like in a matter of hours. I actually had to wear a robe and slippers this morning, instead of a pair of disreputable-looking shorts and flip flops. Too cool in the house. Which is good news for this delicious into-the-slow-cooker dinner.

I went foraging in my freezer yesterday and thawed a pair of small, 2 pound each pork sirloin tip roasts that would be perfect in an all day hot bath of soy, five-spice powder and other tasty Asian ingredients. Would also work well with 4 pounds of boneless pork shoulder. Took exactly 5 minutes to cut the meat and put all the ingredients into the slow cooker this morning. All the ingredient come out of jars. I highly recommend keeping things like minced garlic, ginger and asian chili paste in jars on your fridge door for morning when you need to prep and don't have time to chop, chop, chop.

This would have been nice with some quick rice to sop up the juice, along with the spinach I served with it. But since we rarely eat grains, it was a no rice night. The famous low-carb cauliflower rice would work well too. It was still a wonderful thing, tender, falling apart pork full of anise-y, sweet spice, and ginger tang, with the juices drizzled over steamed spinach. The sliced scallion garnish is a nice pop of fresh onion on top, too.
Far East Five Spice Pork in the Crock is ready when you walk in the door.

Note: Pork shoulder is rather fatty, so trim any big bits of fat off when you slice the meat before placing in the pot. Sirloin or loin is leaner and won't need a trim. Leftovers reheat beautifully in the juices.

Pork sirloin tip roast; the front roast has been cut into 4 pieces.

Far East Five Spice Pork in the Crock


Serves 6 to 8

1/4 cup gluten free tamari soy sauce
1/2 cup dry sherry
2 teaspoons Chinese five-spice powder
2 tablespoons of honey or equivalent liquid stevia
1 tablespoon minced garlic (jarred)
1 tablespoon grated fresh ginger (jarred)
1 teaspoon Chinese chili garlic paste (jarred)
4 lb. pork sirloin tip, or lean pork shoulder cut in 8 thick 3" by 6" slices
finely sliced scallion for garnish

1. Place up to the pork into a 4 to 6 quart slow cooker crock. Mix well. Add the pork and turn to coat with the soy mixture.

2. Cover and set the crock to LOW and cook for 9 hours. Shred the meat to serve with a healthy drizzle of the cooking juice and a sprinkle of finely sliced scallion.

Dinner is served...on a waiting white plate...

Wednesday, April 3, 2013

Quick Chicken with Leeks, Tomatoes & Sherry

Nothing makes me crazier than not having our meals planned ahead. I admit to being so much of a Susie Homemaker that I actually have a good idea of what will be on the family table within the next week. Usually Monday's dinner is a Part Deux of Sunday's meal. I get home late, and it's easy for Chuck to just reheat. But not cooking dinner on Easter threw me a loop, and I totally forgot to get anything going for Monday's dinner on Sunday night. So I'm laying in bed in the wee hours of the morning, just before the alarm goes off freaking out that I was going to have to add making dinner to my morning chores before work. Ugh.

So 6:30 Monday morning finds me in my ratty red robe, standing in front of the stove,  browning boneless, skinless chicken breasts in olive oil. A granny fork in one hand, a mug of coffee in the other.  I  had absolutely no idea what I was going to do with these insipid things and was considering pulling a bottle of barbecue sauce from the pantry, dumping it into the pan and calling it done. But when I'd pulled a bag of frozen strawberries out of the freezer, I also saw a bag of frozen chopped leeks from Trader Joe's.  Chicken breast with leeks sounds much more appetizing than gloppy barbecue  sauce. And boneless, skinless chicken needs something. This chicken dish came together in a flash, and it reheated on Monday night in 10 minutes flat, with a side of rice and green beans. All I can say is that this tastes wonderful and will now officially become a fast go-to weeknight recipe. 

Everything in this great one-pot dinner came from my pantry and freezer. If you don't have frozen leeks, either cut some up yourself, or just substitute onions. Not quite the same dish, but still delish.


Quick Chicken with Leeks, Tomatoes & Sherry

2T olive oil
3 large skinless, boneless chicken breast, split in half and pounded to 1/2"
3 cups sliced leeks, white and light green part only, fresh or frozen, or onions
2 garlic cloves, minced (jarred is fine)
1 14 oz. can diced tomatoes
1/2 tsp. dried thyme
(1 T orange or lemon zest, opt.)
salt and fresh ground black pepper to taste
1/2 cup dry cocktail sherry
1/2 cup water

Heat the oil in a large sauté pan over medium high heat until it ripples. Add the chicken breasts, and brown on both sides; cook them in batches so the pan isn't crowded. Remove the chicken to a plate and add the leeks or onions, and the garlic. Season lightly with salt, and use the liquid produced from the leeks to loosen and browned bits from the bottom of the pan. add the tomatoes, and all the remaining ingredients and bring to a simmer. Place the chicken back in the pan, cover and cook about 20 minutes until the chicken is cooked through. Serves 2-4., and reheats beautifully.

Quick Chicken with Leeks, Tomatoes & Sherry

Wednesday, February 6, 2013

Simple Broccoli Rabe Soup: Breaking Winter's Back

According to my Farmer's Almanac, winter's back is broken on February 16th. I have a problem with that, because I am totally tired of the cold, spotty snow and general grayness we've had this winter NOW. I am officially  sick of winter. Either give us one good, deep, real snow, or just go away, Old Man Winter, and let us have spring.

Well, I'm sure that helped a lot. About as effective as trying to bail the ocean with a thimble. But I have other ways of keeping winter at bay, and yes, many of them involve food, chocolate or planes heading south. One of my favorites is a soup I took for granted as a child. Well, technically it isn't necessarily called a soup. It's one of the most comforting things I can think of to make a late winter day bearable: good greens, cooked in good stock with lots of garlic. Love in a bowl from an Italian grandma, I tell you. 

Greens are always one of the first things to pop up in the market at this time of year, because once February hits, it's already spring somewhere. So the greens are already starting to look good, not tired as they look in December. The broccoli rabe was very nice this week, tender not big and tough and woody, but if it isn't nice when you shop, just substitute some escarole or baby kale. Even spinach, just don't cook it so long. Look for greens that will cook to tender in less than 15 minutes; leave the braising greens like mature kale or collards for another dish.

If you have some homemade stock, some garlic, oil and your favorite greens, you are about 10 minutes from making the basic black dress of soups. You can dress it up innumerable ways. I like a dusting of Parmesan or Romano over the top, or a slice of toast (a crostini) grilled with some Gruyere on top afloat in the bowl, or even some small pasta like orzo, tubetini or pastene cooked in the soup. Leftover diced chicken or turkey, or tofu...all good. This soup hints of spring, and really will break winter's back.

This dish, basically greens cooked in broth, is only as good as your ingredients. If your broth isn't great, neither will your soup be great. If you use chicken broth, it should sing of chicken, if vegetable, it should be rich and robustly flavored. It should be utterly delicious served just as it is. Not a place to use up tired or worn out vegetables, sprouty garlic, or cheap boxed broth.


Italian greens in broth: Simple Broccoli Rabe soup

Simple Broccoli Rabe Soup

4 - 6 Servings


Ingredients:

1T extra virgin olive oil
3 - 4 garlic cloves, minced or thinly sliced
2-1/2 quarts chicken or vegetable broth
1 large bunch broccoli rabe, tough stems removed,  chopped 
Pinch dry oregano
Pinch or more of red pepper flakes
salt and fresh ground black pepper

Optional additions: 2 oz. small pasta like orzo or  pastene , croutons, slice bread  toasted and topped with cheese.

1. Heat the olive oil in a 4 quart or larger saucepan over medium-high heat. When it thins and ripples, add the garlic, and stir a minute or so until the garlic is coated in oil and fragrant.

2. Pour in the broth and bring to a boil. Add the broccoli rage, the oregano, and the red pepper flakes, bring back to a simmer, and cook about 10 minutes, or until the largest stems of the rabe are soft. Taste for salt and black pepper and season accordingly.

Note: if you want some sort of pasta in this, add to the broth just after the broccoli rabe and if it's the tiny stuff, it should be done when the rabe is cooked.

Roughly chopped broccoli rabe: looks almost springlike, huh?

Friday, September 28, 2012

Fie, Fie, Foe, Friday: Fermented & Demented Hot Sauce

Fermented & Demented Hot Sauce
Somewhere, just before the turn of the last century, I got bit by the pickling bug. Not just the vinegar kind. Fermented pickles. Kimchi. And sauerkraut. It started with a nice lady named Min. She and I worked at a Whole Foods at the same time, and we'd share things from our home-packed lunches. She had never eaten eggplant Caponata that my Italian family has always made from our homegrown eggplants and garlic, and I had never eaten homemade Kimchi. A revelation for us both, but bigger for me. After I had kimchi more or less figured out, I went on to growing and pickling short, fat cucumbers in a crock with dill and garlic, the way our neighbor Mrs. Shultz did when I was a kid. Then sauerkraut. I made quite a bit for a while, and then stopped for a few years as there were too few of us kraut-eaters in the family. More kimchi and Moroccan preserved lemons. Then a real hiatus.

I started again a few years back, making some naturally fermented foods to slip into my son-in-laws lunches while he was fighting cancer. Because the pickles and the sauerkraut are delicious, and also because fermented foods are considered to have some health benefits. I wish he was still alive to taste this latest batch of hot sauce. He'd have loved it. He'd have been crying while he ate it, because it's arse-kicking hot, but he'd have loved it. I grew both these killer-hot jalapeños this summer, and the garlic I used here. This stuff is crazy good. Demented.

The big thing for me is flavor. Fermented pickles have an entirely different flavor profile that I adore, and I wanted my hot sauce to have something going on in the background besides just vinegar and heat.

In the old days, I don't think people were as precise as we are now when they were pickling, or doing any sort of food preserving. They learned what worked and stuck to it. There is an absolute TON of information on how to ferment hot peppers (and lactic fermentation of many foods) on the web, and you can use any one of those methods. What follows is very basic, so do a search if you have questions, or post them in the comments below.

Mine is pretty simple: you'll need a jar to hold your peppers to the top, with a fairly narrow opening.  A quart  is a good size. A canning jar. The jar should have "shoulders". You'll need enough hot peppers to fill the jar tightly,  1 big bell pepper, a handful of peeled garlic cloves, a scale, some non-iodized salt (use kosher) and water that has no chlorine in it. If your tap water has chlorine in it, let it stand in a bowl for a few hours so the chlorine can dissipate, or use filtered water.

Weigh 50g of salt and mix it thoroughly into 1 liter of water. This is your 50% brine. Wash the peppers, and trim off the stems, and most of the green top. DO NOT touch your face while handling peppers or wear gloves. Pack the peppers into the jar, adding a few garlic cloves here and there. Pour in the brine to near the top, then cut a piece of the bell pepper bigger than the jar opening, and fit it into the jar so it holds all the peppers and garlic below the liquid. I had a couple of absolutely huge jalapeños, so I just criss-crossed them at the top near the opening to hold the peppers down.  Top it up with brine so the brine comes top of the jar rim. Cover it with a clean cloth,  set it aside, and check it every day, skimming off any mold that forms. This strong brine can take 10 days to two weeks to get good and sour. It'll smell a bit like sauerkraut as it ferments. If you ever think anything is going really wrong. throw it out, and consider it a cheap learning experience.

Once your peppers are pickled, Pete, place a strainer over a bowl and pour the hot peppers and garlic into the strainer. Keep the brine, you'll need it.  Clean out your blender and turn on your kitchen exhaust fan. Now you can make:

Fermented & Demented Hot Sauce

Ingredients:

1 quart of fermented  peppers and garlic, drained and brine set aside
1/2 cup cider vinegar
6 whole cloves
6 whole allspice berries
1 tsp. fennel seed, bruised
2T raw honey

Instructions:

1. In a small non-reactive saucepan, combine  the cider vinegar, the cloves, allspice and fennel, bring it to a quick boil, shut it off, cover the pot and let it steep, off the heat, for a half hour.

2. Strain out the solids and pour the vinegar into the blender jar. Add the honey and the peppers. Puree, adding the saved brine as needed to make a sauce consistency. Do NOT put your face anywhere near the top of the jar, and open it cautiously. The fumes from the peppers can make you cough and choke.

3. Place in a quart jar, in the fridge and let mellow for a day or so before using. Makes about 3 cups. If you save  the remaining brine in a covered jar in the the fridge, you can use it to "spike" another spicy fermentation project.


Monday, August 20, 2012

From Garden to Plate: Spinach, Cauliflower & Cheddar Bake

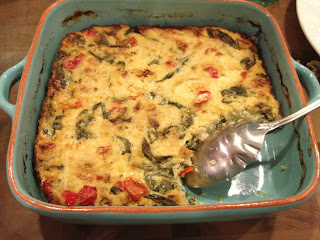
Spinach, Cauliflower & Bell Pepper Bake
Now that we've joined the Big Green Egg cult, I haven't cooked a single piece of meat in the house, unless you count a pan or two of bacon. While I used to be the BBQ Girl around here, regularly loading and running a smoker full of apple logs and briskets while my disinterested DH watched baseball, I am now Kitchen Girl. The Egg has kindled a new interest in outdoor cooking in him and I am relegated to the side dishes. For the moment...I'll be back out there as soon as I can.

Meanwhile, though, it has given me a man-free kitchen to whomp up something to go with the manly burnt offerings (actually he hasn't burned anything, but it sounds good). And when you cook the meat outdoors, there is no roasting pan to wash. So it's all good and I pretty much love our Egg as much as he does, maybe more, since I've wanted one far longer. But I digress...

Remember I was whining about  the slim pickings in the garden last Friday? Well, it still is producing a little of this and that. All good.  Some shallots dug a few weeks ago, garlic, and bell peppers. And I got a very small cauliflower at the farmers market on Friday which, when you are aiming for low- carb, is a godsend. It made the base for a good cheesy dish that's somewhere between a casserole and a crustless quiche. You can add or subtract whatever you don't like here, but the eggs and sour cream proportions need to stay constant, or, well, you have an entirely different dish...possibly not bad, but different.

Note: to grate cauliflower, just scrape it on the big holes of a box grater, or chop it medium-fine in a food processor. To cook it, I just sauté it in a bit of butter until soft. If you want to keep this dish vegetarian, either use vegetarian Worcestershire sauce, or Pickapeppa sauce which has no anchovies in it.
Homegrown peppers and shallots.
Spinach, Cauliflower & Cheddar Bake

3 cups of grated cauliflower, cooked soft
1T extra virgin olive oil
1 large shallot, minced
1 garlic clove, minced
1 red bell pepper, diced 1/2"
5 oz. baby spinach
2 eggs
1 cup sour cream
1 tsp. Cholula or other hot sauce
1 tsp. Worcestershire sauce
1 cup shredded extra sharp cheddar cheese
salt and pepper

Preheat the oven to 375ºF. Oil a 9" square oven-to-table baking dish. Heat the olive oil in a large nonstick frying pan, and add the shallot, garlic and bell pepper. Sauté on medium heat until the pepper is soft and the shallot is limp. Stir in the spinach a bit at a time and cook until it just wilts. Turn off the heat and set aside in the pan to cool for a minute or two.
Infinite possibilities with fresh-from-the-garden vegetables.
Whisk together the eggs, sour cream hot sauce and Worcestershire in a medium bowl. Stir in the cheese, and the vegetable mixture from the pan. Season to taste with salt and pepper. Pour the mixture into the prepared baking dish and bake for 45 -60 minutes until brown at the edges and bubbly. Good side with grilled meat or as a vegetarian main with a salad.

Serves 4-6.

Friday, June 8, 2012

Deep, Rich & Spicy: Some Like It Not Hot Chili

Wait, where's the tortillas???

Chiles de Arbol? Nope. Pasilla chiles? Nope.  Any Jalapenos, for God's sake? Nope. Is it delicious? Hell YES! There are a lot of folks out there who simply cannot tolerate the heat of chiles in anything. Some of them even frequent my table from time to time. Just because you can't handle foods loaded with chile peppers doesn't mean that you can have a good bowl of chili, or a chili dog. Many of the chili recipes you find around now have 2, 3 or even more kinds of chile pepper in them. Luckily, this isn't one of them. Most chili recipes that omit the hot peppers are nothing more than a Sloppy Joe with beans. This chili is wonderful, with rich, deep, smokey flavors, but no heat. It's the real thing, as far as I'm concerned, but without the burn. I do like killer hot chili, myself, on occasion. Even though I'm from Philadelphia, not a place that spends any time debating chili recipes, I know there are as many opinions as to what constitutes an authentic chili as there are people who eat it. Trust me, this is GOOD, if you need heat, sit down with a bottle of hot sauce next to your plate, or top it up with chopped pickled jalapenos.

Get it all out before you start so you don't forget anything.

Note: Be sure the chili powder you use is a "regular" or "mild" chili powder, otherwise, this is all for naught. A good mild chili powder will have ancho chiles in it, along with some garlic, cumin and oregano (Mexican). Not much else. This recipe is also a little lower in carbohydrate and higher in protein than other chili recipes thanks to the black soy beans.


Deep, Rich, & Spicy No-Heat Chili
Some like it not hot!


1 T safflower or extra virgin olive oil
2 lbs. lean ground beef (90% or leaner)
2 garlic cloves, minced
1 medium-large onion, diced
2-3 T mild or regular chili powder
1 T ground cumin
2 T Dutch process cocoa powder
1 teas. smoked Spanish paprika
1 cup of strong, brewed coffee
1 15 oz. can black soy beans, drained (Eden brand)
1 28 oz. can diced tomatoes
1 tsp. Kosher salt

Heat the oil in a large broad deep pan until it shimmers. Add the ground beef and break up as it cooks with a wooden spoon to keep it loose and crumbly. When it begins to brown and starts to stick a bit, add the onion, garlic and all the spices. Give it a big stir for a minute or so, and then add the coffee, soybeans and tomatoes with all their juice. Add about a teaspoon of kosher salt and stir well, partially cover and reduce the heat to simmer the chili for about 40 minutes. taste for salt before serving.

No Heat Chili ready to dish up and chow down!
Makes 6 meal-sized servings, more if it's used as a topper for nachos or chili dogs. Nice topped with shredded cheese, or chopped onions, pickled peppers or sour cream.


Monday, June 4, 2012

Curlicues in the Garlic Garden: Simple Garlic Scape Pesto

Love equals garlic scapes.
Summer is rushing in and I am rushing around in the garden. It's already garlic scape season and I am not ready! I'm hurrying to plant the last of the summer seeds I want this year, like more chard, and mulching against the onslaught of weeds and dry weather. While we had a warm winter, a cold, damp spell in the early spring put the kibosh on some of my garden seeds. First time in more than 3 decades of vegetable gardening I had bean seeds rot in the ground. Minor disaster. So to be safe, I waited until much later to get a second batch going. I'll be canning and freezing a lot later into the summer than I'd like, but it can't be helped. At least the garlic, planted last October is behaving nicely. Beautiful garlic scapes are rising and beginning to curl.

Garlic scapes are the flower heads of the garlic plants and come from hardneck garlic; you'll see them looking like something from outer space at the farm markets now through the end of June, depending on where you are and what variety of garlic the farmer has planted. Longish green sticks with curly ends. Try if you can, to get the less curled scapes as they'll be more tender than the prettier curlicues. Most farmers lop them off as letting them develop can sap the strength from the garlic bulb, and also reduce their size when harvested. Lucky us. We get to enjoy the scpaes, and the garlic a few weeks later.

Just picked and at their peak this week
and for a few more weeks in June.
Do not pass them up in the market, or you'll be sorry. They have a fresh, green, sharp garlicky flavor like nothing you've ever tasted. If you buy some or are lucky enough to grow some garlic, you can store the scapes in the fridge for a few days in a zip bag. There are certainly plenty of recipes around for using the garlic scapes in sautes and stir fries, as well as various forms of pestos, with all sorts of cheese and nuts added. Personally, I just like to puree it with some high quality extra virgin olive oil so I can use some of the puree fresh immediately, and freeze the rest for when the tomato season begins in earnest.

Keeping it simple allows me to add other things to it as I please, at serving time, like cheese, nuts or herbs. Or I can add it into other recipes where the usual cheese and nuts would be out of place. Nothing like a warm garden tomato with garlic scape puree and some fresh ricotta cheese. Spoon it over pastas, roasted vegetables or cooked new potatoes. Dip your bread in it. Wallow. The season is SO short.

There is no recipe, per se. Cut the scapes into 1/2" pieces and place in the bowl of your food processor or blender container. Add enough oil to barely cover them. Process to a paste. Add more oil until it's a thick sauce consistency. Use immediately, or store frozen. To keep the bright green color, press some plastic wrap onto the surface before sealing the container for the fridge or freezer.

Friday, May 25, 2012

Roasted Zucchini with Feta, Olives & Roasted Tomato Vinaigrette


Roasted Zucchini with Feta, Olives & Roasted Tomato Vinaigrette

There are weeks where bits and pieces just pile up. The backseat of my car looks like a thrift shop with a food processor, a yogurt maker and a lampshade all destined for new owners. My desk is four inches deep in decor catalogs since we're looking to replace a few things in the living room. My fridge, well, don't ask. There are odds and ends of blog food, restaurant leftovers and impulse produce buys that are begging to be reinvented. And eaten. Goat cheese from a week ago, and roasted tomatoes we made here on Wednesday this week. Some small zucchini from down South where there already IS garden zucchini. 

Depending on what day you ask, leftovers from blogging recipes are either a curse or a blessing. They started out this morning as a curse because I literally could not find a box of blackberries in that fridge for all the other stuff piled up. Tonight they've become a blessing: a nice light dinner for me.

This isn’t really a salad, but could be served as an appetizer or salad course. To make it heartier, add some of the chick peas from Monday's blog post, or some slivered salami, even  cooked chicken if you don’t want to go vegetarian. It would still be still gluten free, assuming the meat you choose has no binders added.

Roasted Zucchini with Feta, Olives & Roasted Tomato Vinaigrette

For the zucchini:
4 medium-small zucchini
2-3 tablespoons extra virgin olive oil
1/2 teaspoon kosher salt
1/3 cup pitted Kalamata or oil-cured black olives halved or quartered
4 oz French goat feta, crumbled

For the Roasted Tomato Vinaigrette:
2-3 roasted garlic cloves from the tomato recipe (see link)
1/4 cup extra virgin olive oil
2T homemade flavored white wine vinegar or plain white wine vinegar
2 tsp. kosher salt
1/2 tsp. hot pimentón (hot smoked paprika)

Preheat the oven to 425°F and cover a rimmed baking sheet with aluminum foil. Trim the ends from the zucchini, cut in half lengthwise, cut each piece in half through the middle and then cut each quarter in half or thirds so you have about 3” zucchini spears. Place in a medium bowl, add the olive oil, and the salt and toss well, then arrange on the covered baking sheet skin side down. Roast for about 40 minutes until they are just starting to brown. Remove from the oven and let cool slightly.
Zucchini ready to roast.
While the zucchini are cooking, in a mini processor or blender, combine all the dressing ingredients until smooth.

To assemble the dish, place about 2 tablespoons of the vinaigrette on the bottom of a small plate, arrange the zucchini on top, and sprinkle with the feta and olives.

Serves 4.

Wednesday, May 16, 2012

Copy Cat Blog: Compound Vinegar with Lovage, Thyme and Garlic

Vinegar with Thyme, Lovage & Garlic
Ok, this is probably the third blog where you’ll see this vinegar, but it was so beautiful when I saw it on Marisa’s blog “Food in Jars” and then again on “Lottie and Doof”, and well, I have a big old chive plant in the middle of the veg garden. So if I'm going to be a copy cat, the least I can do is borrow a topic from the big bloggers.

Chive Blossom Vinegar
But there’s more. I really want to talk about compound vinegars. That’s the old-fashioned name for flavored vinegars. This is the Chive Blossom vinegar from my garden’s chive blossoms. And we’ll make a different kind here today too.

There is nothing like dressing a salad in the dead of Winter that’s scented with fresh basil from last July’s Farm Market. Or that beautiful pink chive vinegar in a cruet on the table. Making flavored or compound vinegars allows you to be completely creative and make something totally unique. Try unusual combinations of herbs or spices that appeal to you; you may hit a winner. At this time of year, late Spring, the fresh herbs and aromatics available  are fabulous.

The simplest way to make seasoned vinegar is just wash and dry whatever it is you’d like your vinegar to taste of, pop it in a jar, cover it with vinegar, put the lid on it and store it in a dark coolish place for a few weeks and then enjoy the flavored vinegar. The acid in the vinegar preserves the vegetation (herbs, chilies, garlic and the like) you’ve put in there and the vegetation flavors the vinegar. If you’d like to speed up the process, just heat the vinegar to just below a boil and pour the hot vinegar over your herbs in a clean glass jar or bottle. You can certainly vary this even further with the addition of spices like black peppercorns, mustard seed, coriander, cloves or whatever makes your taste buds happy.

A chopstick helps push the herbs into the bottle.

It’s wise to pick fairly unassertive vinegar to start out with, if you want the flavor of your additions to really come through. I like white wine vinegar, and plain unseasoned rice wine vinegar. You can use cider, red wine or sherry vinegar, but they need bold additions to co-exist with their bold tastes.
Just needs the vinegar added,
 and then we wait...

The Non-Recipe for Thyme, Lovage and Garlic Vinegar

I’ve kept this batch simple. I’ve simply added homegrown fresh thyme, a few bruised, peeled garlic cloves and a perennial herb called lovage from my garden ( it tastes a lot like celery) to white wine vinegar in a nice Italian glass bottle I got here. Use a chopstick to push the herbs into your bottle or just use a clean glass canning jar. Pour the vinegar over to cover. Store for a few weeks in a cool dark place. You can strain out the solids before you use the vinegar if you wish. Yum in salads, recipes, and if you are brave with seltzer as a cooling beverage.

Friday, September 23, 2011

The End and the Beginning: Pickled Jalapeños with Garlic


This was supposed to start out with all the wonderful things to cook from a burgeoning garden, except, evidently, Mother Nature didn't want to cooperate. But I did sneak one in on her. Jalapeño peppers. Lots of them. Buckets. Killer hot, too.

After nearly 35 consecutive seasons of vegetable gardening and the resulting canning, freezing, smoking and just plain trying to give away the excess produce, for once I have almost nothing to show for it but jars of  Peach Jalapeño and Bourbon Jam, and jars of pickled Jalapeño Peppers with Garlic. For some reason only the Universe knows the damned jalapeño plants LOVE drought, flood and earthquakes. It's late in the season and they are STILL flowering and fruiting, while the tomatoes are dead. It might be the end of the garden, but it is always a good time to start.

Commercial family farms here on the East Coast have been hit by the rough weather so badly that really, I have no room to complain, but I was dreaming of tomato tarts from roasted Amish Paste Tomatoes and ground cherry jam on cold February days. But you know, nothing wrong with warming up the Winter with the bite of Pickled Jalapeño Peppers with Garlic, either.

Pickled Jalapeños with Garlic
Makes 4 pints

2 pounds fresh Jalapeño peppers, mix red & green if possible
4 large garlic cloves, minced
5 teaspoons of pickling salt
3 tablespoons sugar
5 cups white distilled vinegar
1 cup water


  1. Wash 4 pint canning jars, with new lids and bands. Bring a water-bath canning kettle full of water to cover the jars by 1" to 2" to a simmer. Sterilize the jars and lids per the instructions from your canner.
  2. Cut the peppers into 1/4" inch slices, and mix in a bowl. Discard the stems. Be careful handling peppers; try to use tools, or put plastic bags over your hands to avoid contact with the hot stuff.
  3. Put the garlic, salt, sugar vinegar and water into a large saucepan, and bring to a boil, then reduce to a simmer for 3 minutes or so.
  4. Tightly pack the peppers into the jars, but try not to crush them too much.
  5. Ladle in the vinegar mixture into each jar, filling to just under 1/4" from the top, carefully scooping in some of the garlic.
  6. Wipe the rims with a damp, clean paper towel, and place the lids and bands on, sealing just hand tightening.
  7. Place in the water bath canner, and bring to a boil, covered, and process for 15 minutes.
  8. Remove the jars to a rack or a folded kitchen towel and do not disturb until completely cooled. Mark your jars with the date and contents, and try not to open for a few weeks. They should keep for a year or so, if you don't find lots of ways to scarf them down sooner.