Monday, December 3, 2018

Fee, Fie, Foe, Friday: Thawing My Frozen Heart

Have you ever had a personal winter? Where you went all cold and frozen inside, and it felt less like a normal winter, and more like your heart was embedded in permafrost? When my husband died, nearly 5 years ago, that is pretty much what's happened to me. Yes, as time passed, I've been able to go about my day, get through life, even have some fun. But the frozen part just stayed, and stayed. No thaw.

I started writing this blog back in 2011. That seems like another lifetime, and it was. When my life froze over, early in 2014.  A part of my heart and soul  was stolen by cancer at the end of February, in 2014.  My brave, sweet, and charmingly grumpy husband, Chuck, was taken from me and our family by a fast-spreading pancreatic cancer. I'm trying not to weep as I write, but am pretty well unsuccessful.

He was a picky eater; I've certainly made no bones about just HOW picky he was. Chuck's "no" list was much longer than his "yes" list. Strange partner for a food blogger. But he was my muse, my love, and my best friend who honestly, and often bravely tasted, and (usually) ate the recipes I've posted here. Offered astute suggestions for change or improvement, and sometimes told me to toss the whole mess. If I had to toss it, he unfailingly took me out for dinner. I tried to keep this blog going, I really did, since before his illness began, it had brought so much joy and delicious food to my extended Tribe. Then I just froze.

No apologies here, just an explanation of why I've not been writing. Grief and loss are strange creatures that come to live inside us, and when we think we have finally made peace with them, they bite us again with their tiny sharp teeth creating more pain. I think I froze hard so the little bastards couldn't keep sinking their teeth into my soft places.

So many things changed.  After a few of years rattling around in our big house, with my grand kitchen,  and big garden, I knew it was time to move. That house was about us, and the rest of it was going to have to be about me. I was thawing and I didn't even know it. I have a new home, with a new kitchen, not so grand but every bit as functional. And still a garden, but small, and equal in the pleasure it brings. I live in a townhouse in a condo community, that really is a community, with real neighbors in the true sense of the word. Even though it's early December, the thaw still is ongoing. Who knows, maybe something will even bloom. Judy 2.0

Way back when I started writing about food here, eliminating sugar and grain was so often my focus when creating delicious food that wouldn't make us fat and sick. Unfortunately, I tried to eat my grief away, and my sweet tooth got a firm grip. As my frozen heart began to thaw, I found there was a good 20 pounds more of me than there had been before Chuck got sick. My advice has always been, from my years of teaching diabetics (I'm not a registered dietitian) what to eat and how to cook, to limit carbohydrates. It was always easier, and a lot more successful than the traditional, low fat, reduced calorie programs that continue to have followers for years, even though they never lose all the weight or keep it off.

Still, the low carb approach had a few problems,  especially if you tried to align it with the low fat, low calorie song the sirens still sing. Low carb and low fat is tough, and isn't something most people can continue for life. So we were all still crashing onto the rocks.  Back in about 2008, I began to see bits and pieces appear in journals and sites about the ketogenic diet. It made therapeutic sense. I started telling clients to start adding more fat to their meals, good fat, that it would help them stay satisfied, and it did. But it never dawned on me to do what I was teaching diabetics to do, because I'm not diabetic. I'd tried several of the more popular low fat, low calorie plans after a few accidents, when inactivity cause some temporary weight gain, and they worked to a point, with a lot of deprivation and will power.

My big change came last spring. I'd been fooling with a 5 pound weight loss for months. Mostly, the weight just hung on. Since I moved, and had begun to feel settled in, I'd been reducing my carbs and calories, and had begun to lift weights.  My weight went up and down, up and down. And then a customer at work, when asked if she knew which sales person had helped her, she responded, "The chunky blond." That made something snap. Until I reached my 50s, I was always rather underweight. Menopause changed things up, and I was in the normal weight range, at least until my personal permafrost started. I'm somewhere just under 5'2" tall, and 20 pounds doesn't spread out as far as it does on someone tall. Chunky. Geez. Me, chunky!!!???

"Chunky" worked. I started reading, and reading more.  High Fat Low Carb (HFLC) or Keto seemed to be the way to go. I was going to give it a month. On traditional diets, like Weight Watchers, I'd never lost more than a couple or three pounds in the first month. I was generally lucky if I lost a whole half pound in a week, after that, tracking and going to bed hungry. So I  tweaked my already low carb diet significantly lower, and raised my fat intake. What could be bad about an eating plan that let me have a big steak and salad with blue cheese dressing, or a glass of wine with triple cream brie every day? I figured, as long as I didn't get heavier, and could keep up my jogging and weight training schedule, it would be fine. Really low cal diets leave me tired and grumpy. And while keto isn't high calorie, the fat is so satiating, you tend to eat fewer calories than you actually need.

It was near the end of June, and my pal Sharon was in Philly visiting from NOLA, and she, too, had defected from traditional weight loss plans and was attempting low carb, high fat. We discussed it over corned beef specials in the Reading Terminal Market, for gods sake. That was the last bread I've eaten, and now a little over 5 months later, I'm as lean as I was when I met Chuck. I lost 6 pounds that first month. Now I'm more than 20 pounds lighter, and in the best shape of my adult life. So all this is to tell you that most of the recipes here will be Keto/ LCHF friendly, not all, but most. Many will be Paleo friendly, too. Some also will just be traditional favorites, or damnably delicious, and while not adhering to any "way of eating" worth the splurge. It's a life, not scourge. I'll include some links below to sites I've found helpful on this journey, because it has been one lovely, strange trip so far.

So, I'm back, Tribe.  Leaner, and ...I'm nearly thawed.

The links I was telling you about:

This is the best for just getting started. It's simple,  from Eric Westman, MD,  from the Lifestyle Medicine Clinic at Duke University Medical Center and no malarkey:
https://www.dietdoctor.com/se/wp-content/2014/10/no_sugar_no_starch_diet.pdf

And if video is more your style, start with Ken Berry, MD-- he's also fun to watch!
https://youtu.be/xwKmVjSXTDk

About 10 pounds down, in July, and thawing...at Chanticleer Garden


Wednesday, April 20, 2016

Matzo Balls, Macaroons, & Aunt May, Redux

I was just about to start a batch of these matzo balls, (4/20/16)  when I realized that I had never added to this recipe, that for an absolutely sublime version of this soup, I substitute duck or goose fat for the chicken fat, and  homemade duck stock alone, if there is enough, or mixed with homemade chicken stock. And remember, no matter how your soup turns out, who's on the chairs around your table ( and why ) is more important than what's on the table.


From 2013...
Some of you will notice this is a slightly edited version of an older post. But for the last several days at work, we've had a steady stream of customers getting ready for their Passover meals. Next week the Easter shoppers will start, but right now I'm comparing recipes with a lot of good cooks for the primo matzo ball soup recipe So I stopped on the way home to pick up a canister of matzo meal. It's time.


With these matzo balls, who needs Easter Ham?
Aunt May used to feed me matzo ball soup secretly in the kitchen before Easter dinner. I loved the soup, and I hated the Easter ham and sweet potatoes that were always on the family Easter dinner table. My Aunt May was actually my Jewish step-grandmother who had married late in life into a slightly deranged Italian -French- Catholic family who always had an “American” Easter dinner. Ham, sweet potatoes, asparagus. Aunt May was afraid I’d starve since I’d sit tight-lipped in front of my mother’s baked ham. I don’t know what Mom did to that chunk of smoked pork, but it was always dry, and no amount of pineapple glaze could save it in my eyes. Big hunks of meat were a dangerous thing in my Mom's hands. She was great with fish chicken or ground meat, but give her a ham, or a rib roast and there was a good chance it would be barely edible when she got done with it. 

Not that Aunt May was a perfect cook, either. She actually didn’t cook much, but I loved her matzo ball soup. On the other hand, her macaroons for Passover were so bad we used to hide them under the seat cushions until her visit ended. Sadly, she passed away before I had the sense to gather any of her recipes, but my mother had the matzo ball recipe since it was something her picky daughter would eat. No one, even to be polite, ever asked for that macaroon recipe, although I suspect it was off a cake meal box. Those Passover macaroons were truly vile. Good thing the Easter Bunny had brought some goodies for us to polish off after the dishes were done, and even Aunt May liked a decent dark chocolate egg.

These matzo balls are a bit of a compilation of recipes: Aunt May’s recipe uses the eggs separated and the whites beaten stiff, plus chicken fat (schmaltz) and chicken stock. I’ve added the chives, parsley, the longer resting time and the extra salt in the cooking water. Just like with pasta, these absorb water, and the salty water really helps boost the flavor! My friend Amy has also reminded me to not to lift the lid once you are boiling them. Because these are lightened with egg whites, you don’t want to handle them very much when forming. Compressing and hand forming them will make them rather stodgy. To keep them light and airy when I form them, I use this approx. 1” OXO cookie scoop and just gently roll them off my wet fingers into the pot. They puff to about 1-1/2”.

Puffy, gently chicken-y, and made with love, these taste like just the thing a Jewish “Auntie” would be happy her Italian granddaughter serves each year on her Easter table.

All of you, please, hold your family during Passover and Easter, and if you really want them to know they’re loved, serve them these.

Recipe notes: I make my own chicken stock, unsalted, and I make it double or triple strength. If you don’t want to make your own, buy a good brand of boxed, unsalted stock and cook it down to half its original volume, or cook it with some whole chicken legs and seasoning to make it taste homemade. Use part in the matzo balls and the rest add to the chicken stock in which you’ll serve them. You can sub a neutral oil for the chicken fat, (please don’t use melted margarine) although I save the fat that I skim from the aforementioned homemade stock to use in cooking. Obviously, if you keep kosher, you’ll need to adjust the ingredients used here to suit your dietary needs.

Everybody’s Matzo Balls
Makes 28-30 balls

1 cup matzo meal
4 large eggs, separated
¼ cup strong chicken stock
¼ cup chicken fat (schmaltz)
1 tsp. kosher salt
1 tsp. finely minced chives
1 Tblsp finely minced parsley, leaves only
Freshly ground black pepper, to taste

To cook:
4 quarts of boiling water in a pot that has a cover
2 Tblsp of kosher salt

To serve:

3 quarts of good strong chicken stock
The matzo balls
A few chives for garnish

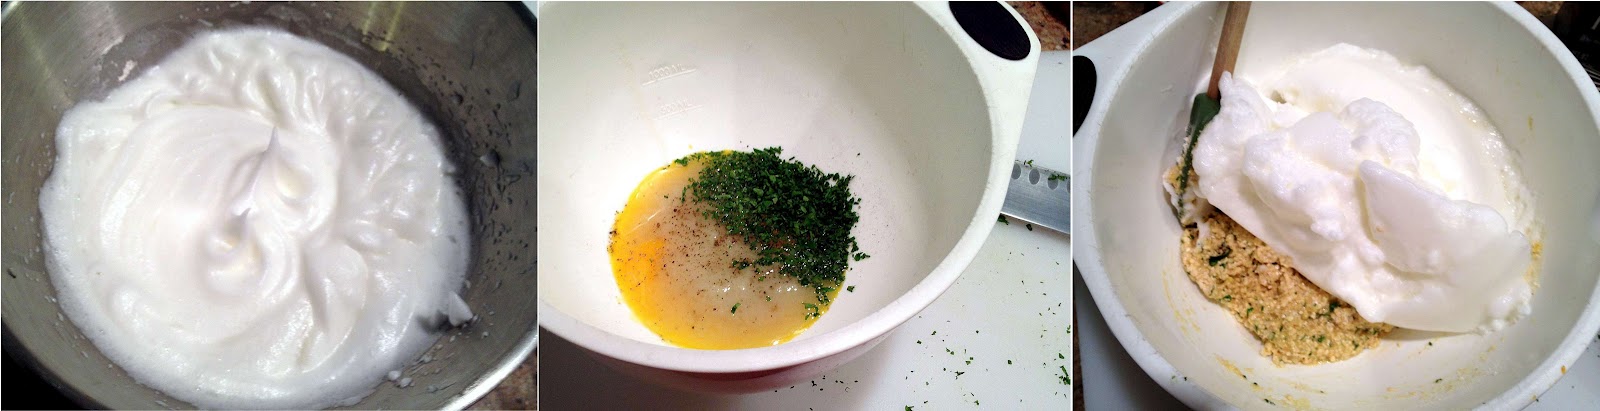
Beat the egg whites in a medium bowl wit a hand mixer until soft, shiny peaks form when you lift the beaters. Set aside. In a second bowl, whisk together the yolks, the chicken stock, the chicken fat, the salt, the chives, the parsley and a few grinds of black pepper. Mix well. Add the matzo meal, and combine it completely.


Simple steps, here.
 Take 1/3 of the egg whites and mix it thoroughly into the matzo meal mixture. Be sure to scrape the bottom of the bowl. Take ½ of the remaining whipped whites and fold it in gently until no white streaks occur. Be sure to get all the way down to the bottom of the bowl. Take the last of the whites and again, gently fold in until there are only a few white streaks. Cover the bowl and refrigerate at least 4 hours and as long as 12.

When you are ready to cook the matzo balls, bring a gallon of water to a boil in a large covered pot, and add 2 Tblsp of kosher salt to the boiling water. Using the 1” cookie scoop  (or a small spoon), portion out little balls of the matzo dough and drop onto your wet fingers and then roll them off your fingers into the boiling salt water. Keep a bowl of water close, and wet your fingers as needed so they don’t stick. When they rise to the surface, stir very gently with a slotted spoon to turn them over, lower the heat to low, cover, and simmer for 40 minutes. They will puff to about 1-1/2”.  No peeking! Remove with a slotted spoon, and either chill, covered well, or place directly into soup bowls.


Do not lift the lid until done...or Amy will get you!
At serving time bring the 3 quarts of chicken stock to a simmer and taste for seasoning, add salt or pepper as needed. Drop in the matzo balls and simmer in the stock for about 10 minutes, if you’ve made the balls ahead and chilled them. If you are serving them straight from boiling, place in bowls, and ladle the hot chicken broth over and garnish with chives.

Makes 28 -30 matzo balls, and will serve anywhere from 6 to 10 people depending on what else is in the meal.

Monday, October 6, 2014

Meaty Monday: Whole Cauliflower with Brown Butter, Sage & Capers

What was left of the cauliflower after the photo shoot...
A lot of things changed last spring when Chuck died, and I simply lost my cooking mojo. It is coming back, bit by bit, and I think some of it has been rekindled by the lovely vegetables and meat I've found in my CSA shares. Life has a habit of going on. Luckily. On Friday afternoon, I had just finished shooting this cauliflower dish when my pal John wanders into the kitchen and says, "What's THAT???! It smells wonderful." Those pictures didn't turn out as well as I'd have liked, but this shot of it after the two of us had a go at the cauliflower right on the platter says it all. The cauliflower is tender, but just holds together until you collapse with a fork it into the rich, toasty brown butter sauce.

Even though today is usually Meaty Monday around here, you need a few good, fast side dishes to go along with the meat. More than a few.  Especially if you eat Primal / Paleo as I do. The uninformed think it is a meat-centric diet; actually it isn't, it's mostly vegetables with moderate portions of high quality animal protein a time or two a day. I generally aim for two cups of cooked vegetables (or the equivalent raw) at each meal, including breakfast.  Just no grain, legumes or processed sugar, although I avoid any kind sugar most of the time.


There has been an absolutely beautiful cauliflower recipe circulating the 'net for the last few years with a whole roasted cauliflower and sauce. The cauliflower roasts for about 1-1/2 hours. Gorgeous, but who, on a work night, really has time to roast anything for that long? I don't.  Can't speak for you, though.  In my  CSA box this week from Lancaster Farm Fresh Cooperative is a lovely, locally grown cauliflower, and it deserves to be shown off. This is the way to do it. The absolutely fastest way to cook a whole, intact, cauliflower is in a pressure cooker. It cooks in 6 minutes flat, and brown butter, one of those delicious but fussy sauces can be making itself in 5 minutes in your microwave with no watching on your part. And you pop the butter in the micro while the cauliflower cooks. Instant dish. Spectacular. Lick the plate good.


This really isn't a recipe. More of a technique following a list of ingredients. If you are Primal / Paleo, use pastured butter.  Set out all your ingredients, and have the sage cut and the lemon squeezed before you so much as touch the pot. This is vegetarian, Paleo, Primal, gluten free, and utterly delicious.


Please use a pressure cooker of 5 quarts or larger with a rack or basket in it and always, always, follow the manufacturers instructions to the letter.


Evidently I can still cook, but the photo skills are rusty.

Whole Cauliflower with Brown Butter, Sage & Capers 

From start to finish, this takes perhaps 15 minutes , and most of that time is hands-off, so you can multitask and make some sautéed salmon or pan-grill some steak while it is all cooking.

1  2 lb. whole cauliflower, leaves removed and stem trimmed flush
2 oz. unsalted butter
Juice from 1/2 lemon
6-8 fresh sage leaves, slivered
2T capers, drained
sea salt and fresh ground black pepper

1. Place 1-1/2 to 2 cups of water in the pressure cooker. Set the rack or basket inside, and set the cauliflower on the rack. Close the lid and seal according to the manufacturer's instructions. Bring to high pressure over high heat. While it heats, place the butter in a deep microwave safe bowl ( I use a 2-cup heatproof glass measuring cup), and cover with waxed paper or parchment, large enough to tuck under the bowl to contain any splatters.


2. When the pressure cooker reaches high pressure, reduce the heat to maintain high pressure for 6 minutes, and cook the butter in the microwave for 4 minutes on high. If the butter isn't brown enough, give it another minute. Remove the bowl carefully from the microwave and set aside.


3. When the cauliflower has cooked for 6 minutes, release the pressure quickly, using the vent carefully (see your manufacturer's instructions for details). When the pressure is down, open the unit away from your face to keep the steam away and carefully lift the whole cauliflower out using two big cooking spoons, or a big cooking spider. Place it on a an attractive platter.


4. Stir the sage into the hot brown butter, followed by the lemon juice and capers. Season to taste with salt and pepper, and then pour over the cauliflower and serve.


Serves 2 to 4 depending on how greedy you are about brown butter.


Friday, June 13, 2014

Fee, Fie, Foe, Friday: Picked Garlic Scapes Today

It seems that just Monday there were no scapes to be seen. Today, with the flood of rain we've had...it was one of the red letter days on my garden calendar. It was time to pick the garlic scapes.
 Since I'm having a yard sale tomorrow, there isn't much cooking going on, but come Sunday, I'll be working on these, and some more garden strawberries. If you have these in your garden this year, because you planted hard neck garlic, or they came in your CSA box,  or from the farmers market, check out this link to Serious Eats and especially the comments for some garlic scape prep ideas. The season is very, very short, so --get going!

Garlic Scape Picking Day! Whoo Hoo! 

Friday, May 30, 2014

Fee, Fie, Foe, Friday: Oh, the Wonderful Mistakes I'll Make!

And, Oh, the wonderful mistakes I've made!  Big and small, I've made them all. (Thank you, Dr. Seuss) Under-baked a cheesecake. That was a laughable mistake that has made for a great family story.  Learned something.  That enormous package of tilapia from Costco? Mistake, but I learned something there, too. Making permanent life changes to meet other peoples expectations, not so laughable. Big mistake, though. Learned big lessons there, too.  I have made millions of mistakes. Millions,  I tell you, mostly small, but a few doozies, too.

As a fairly recent widow, I am making some mistakes, I am sure, I just don't know they are mistakes yet. Time will tell. I'm being cautious, but still. Decisions to be made on my own, though luckily with the help of good advisors.  Trying to go slow and consider. Some things I've chosen I know would have made Chuck yell in frustration at my thickheadedness. But he's not here, and I am.  Some of my choices have already proved to be smart ones,  and a few, not so much, but no big deal, either. We'll see how things pan out.

Besides the lessons learned directly from my mistakes, I have always taken this away, too: I can study all I want, but I've learned the most from being wrong, and making mistakes.  Every mistake has made me wiser in some way.  And I'm no longer afraid to make a mistake. All and all, I think thats what a lot of life is about here on the food chain.


Burnt chicken, Mistake #6,457,623.
Lesson: never walk away from anything in the broiler.

Wednesday, May 28, 2014

The Strawberries are Coming: Again, Almost Amanda's Strawberry Tart

I picked the first handful of garden strawberries this morning, marking the beginning of my 2014 berry season out in my yard. I am planning to make this pie again as soon as full production begins, hopefully within a week, if the sun comes out and it stays dry for a few days. My pal Brad may just get a homemade strawberry tart for his birthday dinner. Please enjoy this post from about a year ago. It's one of the best strawberry tarts you'll eat.

A day or so ago, I was ogling a beautiful peach tart over on Food52. Even Pinned it to make soon. Peaches, so far are not great, and a peach tart will have to wait a few weeks until the height of the season. What I do have is a small glut of homegrown strawberries, small sweet Mara des Bois. And Chuck has been asking for a strawberry pie since I brought in the first bowlful from the garden. Amanda Hesser wrote the recipe on Food52, and she got me when she said the recipe had been her mother's. I am a total sucker for family recipes. I started to read the comments, too and found that many other cooks, since the recipe is a couple of years old, used fruit other than peaches with great success.

I'd told Chuck there would be no strawberry pie since I'd used my last frozen homemade pie shell, and I refuse to use store-bought. He uses them all the time, but I won't. Any fool can make a decent filling; I rest my laurels on my butter and lard pie crust. So, with some trepidation I decided to try this press-in crust from Amanda's recipe that uses oil. Handed-down recipes are almost always good, and this is no exception. I made a few minor recipe changes, besides using strawberries, but it's still pretty much Amanda's mom's recipe, I think. Easy to toss together, for sure. So this version is for you, Amanda, and please thank your mom from all of us.

The best tip ever is in the video with the original recipe over on Food52: pat the crust into the pan from the rim toward the center. With a big tart like this, sometimes it feels like you won't have enough dough to make a nice rim if you start from the center out. This method totally eliminates the problem.

This strawberry tart is wonderful. The berries get an almost jammy consistency, but still have a fresh berry flavor. Please try to use good, local ripe berries for this; those huge, shipped-far, underripe berries just don't match the deliciousness of  the local ones.
Almost Amanda's Strawberry Tart
Too hot to cut yet, but, oh boy!

Almost Amanda's Strawberry Tart

Serves 8
Adapted slightly from Amanda Hesser's Peach Tart on Food52

Note: oils seeds are among the most genetically modified crops on the planet, and the only way to assure you are not using GMO oil is to use organic oils. Light flavored olive oils, are usually overly processed, too. So choose your ingredients accordingly. I use all organic products, but choosing organic oil is probably the most important.

Tools: 11"(or a 9") tart pan with removable bottom


1-1/2 cup plus 3 tablespoons all-purpose flour
1/2 teaspoon of sea salt
3/4 cups plus 1 teaspoon sugar
1/2 cup organic canola, corn or vegetable oil
2T light cream or organic coconut creamer
1/2  teaspoon almond extract
2 tablespoons cold, unsalted butter
1 quart small strawberries, hulled and halved lengthwise (about 2-1/2 lb)

1. Preheat oven to 425ºF.  In a bowl, mix together with a whisk, 1-1/2 cups flour, 1/4 tsp sea salt and 1 teaspoon sugar. In another bowl, whisk together the oil, the cream and the almond extract. Pour the oil mixture into the flour mixture and mix gently with a fork until it's all just combined and crumbly, don't over work it. Dump it into the tart pan, and working from the rim edge towards the center, pat the dough in place, about 1/8" thick.

2. Mix with your fingertips in a bowl, the 3/4 cup sugar, 3 tablespoons flour, 1/4  teaspoon of salt and the butter until it's crumbly and sandy looking.

3. Starting out at the rim, start placing the berry halves, cut side down, in tight concentric circles on top of the dough. Fill in gaps with smaller berries or tear off pieces of strawberry. Sprinkle all of the the sugar-flour mixture evenly over the top of the fruit, and bake for 35 to 45 (mine took 35) minutes until the pastry is lightly browned and the berries look bubbly and jam-like. Cool on a rack and serve at room temp or slightly chilled, with healthy dollops of whipped creme fraiche or whipped cream.

Friday, May 23, 2014

Shockingly Delicious: Mango Banana Curry Ice Cream

Creamy, sweet, spicy, each flavor pops on your palate in harmony. Shockingly delicious, Mango Banana Curry Ice Cream. Must. Have. More. 


I know there are plenty of unusual ice creams out there. Sweet corn. Beet. But this is different. It's strangely addicting. Seriously addicting. Like you want to grab the tub and lock yourself away with it so you don't have to share. I served this to my roommate John and his unsuspecting sister Susan, along with some homemade vanilla ice cream, and we all wanted seconds on the Mango, Banana Curry ice cream. And then thirds. Poor vanilla.


I'm a sucker for the Ataulfo mangoes when they come into season in the spring. I eat too many, really. After the first couple of weeks, though, I usually have more of them parked in the fridge, dead ripe, than I can eat. So sometimes I freeze them. As I put a bag of the peeled and pitted mangoes into the freezer, I saw a couple of forlorn-looking frozen bananas on my frozen fruit shelf (yes, I have a frozen fruit shelf in my big freezer). They wound up there when they were too soft to eat, and were destined for banana muffins that I never  made.  A lightbulb moment: Cold- Mango- Banana. Hmmm...ho-hum....wait...Indian seasonings work in sweet mango  chutneys...Eureka.

Rich, creamy golden goodness,  Mango Banana Curry ice cream
This Mango Banana Curry ice cream is absolutely ravishing, both to the eye, in it's bright yellow hue, and on the palate. Be brave, make it today. I promise it'll be the best thing you've eaten this year so far.

Shockingly Delicious: Mango Banana Curry Ice Cream

Note: The vodka (alcohol) is simply to keep the ice cream from getting icy and and rock hard while it ripens in the freezer after churning. If you can't or won't use it, leave it out, but you'll have to take the ice cream out of the freezer to let it thaw a bit before serving. And use a sweet or mild curry powder here, you don't want to pack heat here, though it probably wouldn't be a bad thing if your family and guests are into it.

Mango Banana Curry Ice Cream


1 lb. peeled and diced mango, (preferably Ataulfo Mango in season) though thawed frozen mango works
2 very ripe medium-small bananas, peeled and mashed
1/4 cup water
3/4 cup cane sugar
2 tsp. sweet curry powder (I use Penzeys)
1 cup heavy cream
1/2 cup creme fraiche or natural sour cream
2T vodka (or a light colored rum would work, too, yum)
1 tablespoon vanilla extract
Juice from 1/2 lime

In a medium saucepan, place the mango, the bananas and the water. Add the sugar and the curry powder, stir and cook over low heat until the mango softens, and becomes sauce-like. Place the mango mixture in a food processor, or blender container. Add the cream, creme fraiche, the vodka, the vanilla and the lime juice. Puree until smooth. Place in a metal bowl and chill for at least 2 hours or until the mixture is below 40ºF. Or put the mixture into a zip-top bag, and place into an ice and water bath until fully cold.

Place into an ice cream maker and churn according to the manufacturer's instructions. After churning, freeze the mixture in a freezer container for three hours or more to ripen and harden. Makes about 1 .5 pints.

Monday, May 19, 2014

Meaty Monday Redux: Quick Sweet & Smoky Grilled London Broil

The grilling season is upon us and I just HAD to bring this oldie but goodie back. Meaty Monday is back, although I am working on ice cream recipes right now... I thought this was a great way to launch the season since we are just about at Memorial Day. Hello, Grill!!!

Quick Sweet & Smoky Grilled London Broil
First off, this whole business of calling top round "London Broil" really irks me. Somewhat of a traditionalist at heart, real London Broil, in my heart-of-hearts will always be flank steak. This new nomenclature, calling top round steak London Broil was foisted off on us supposedly by supermarket meat departments (according to my butcher) because there are only a couple of flank steaks on a steer, but a whole lotta top round. Yes, I know it's leaner, and cheaper, but it's not as tender or tasty. So if you have one of these, as I did lurking in the freezer, you need to boost the flavor, hugely. 

Whew, now that I got that off my chest, I have to say that top round can be fabulous. I picked this one up back in May, a nice grass-fed piece of beef top round while it was on sale at my local Whole Foods. Since we just returned from a vacation at the beach, and I haven't had a chance to do any marketing, it just leaped out of the freezer into my hands. Yes, it did.  So I did what any smart girl would do: I thawed it out, and dolled it up.

This wet rub has big flavor, and it's all likely to be things that live in your fridge and pantry all the time. Plain chili powder, cinnamon, black pepper, smoked paprika, jarred garlic, salt and a lime. The cinnamon makes it taste sweet without adding any sugar, and the smoked paprika adds a smoky zing. Like I said, I didn't have time to shop and we still want a good meal. Good for low carbers and paleo eaters as well as everyone else who likes good meat.

Because this meat is so lean, after grilling, a finishing drizzle of really good extra virgin olive oil, flavored olive oil or a pat of butter (flavored or not) would be nice. If you are eating Paleo, or just lazy like me, go for the olive oil. But if you have some minced green garlic scapes in your freezer, or can mince some garden garlic chives, toss them on the meat, drizzle on the oil, add a squeeze of fresh lime and dig in. This rub works really well on flank and skirt steak, too, so keep it up your sleeve.

Note: Top round isn't as tender as flank for London broil, so be sure to slice it thinly, 1/4" or thinner, with a sharp knife against the grain.

Quick Sweet & Smoky Grilled London Broil

Ingredients:

1 tsp. mild chili powder
1/2 tsp. cinnamon
1/2 tsp. smoked paprika (pimenton)
1T crushed garlic (fresh or jarred is fine)
1/2 tsp. fine sea salt
1/2 tsp. fresh ground black paper
zest of 1 lime
juice from 1/2 lime
1-2 T extra virgin olive oil
1.25 lb. Top Round London Broil

Garnish:

2T Extra Virgin Olive Oil
1T minced garlic scapes, or garlic chives
juice from 1/2 lime

Instructions:

In a small bowl, mix everything through the olive oil, and then rub evenly over both sides of the London broil. Place the meat in a zip bag and chill for at least 2 hours and up to 10 hours. Remove from the fridge 30 minutes before cooking.
Pretty much all from the pantry and fridge.
When you are ready to cook, preheat your grill to 550ºF. Oil the grill, and then place the meat on the grill and close the top. Cook for 3 minutes, then turn and cook for 4 minutes on the other side for medium rare. Let the meat stand for 5 minutes before slicing thinly across the grain. 

To serve, sprinkle over the garlic scapes or garlic chives, drizzle with the olive oil and squeeze over the lime.

Serves 3-4.

Monday, May 12, 2014

Baked Layered Ricotta with Feta & Roasted Vegetables

I know. I USUALLY do Meaty Mondays. This isn't a Meaty Monday because I have a vegetarian housemate. SO shoot me. You COULD always add crumbled bacon or ham or other smoked meat to the vegetable layer. It's already delicious as it is.  I have trouble stopping at one serving, and you probably will too. Actually is good at room temp for lunch, and reheats in a snap in the microwave. It's also grain free and gluten free.

In my house, this is a vehicle for leftovers. I had made a big batch of ricotta last week, and after we had lasagna from it, there was still a great deal of ricotta leftover. Plus, whenever I have too many vegetables lingering in the crisper, I just roast them so they can be added to omelets, or grain salads so they don't get all sad looking and end up in the compost bin. I roasted a baking sheet full of mushrooms, zucchini, red onions, garlic cloves, grape tomatoes and bell pepper, just doused them in evoo, salted and peppered and roasted them for about 35 minutes at 425ºF. Gives me about 2 cups of cooked vegetables. Two cups of pretty much any cooked vegetable works here.

Baked Layered Ricotta with Feta & Roasted Vegetables

Baked Layered Ricotta with Feta & Roasted Vegetables

Note: Please select organic / home or locally grown products for your table... and this can be made without eggs. Drain your ricotta for an hour or so in a fine mesh colander and don't expect the baked product to hold together .

2 lb. whole milk ricotta
2 large eggs
3/4 cup crumbled feta cheese
1T dried oregano
2 garlic cloves, minced
1/4 tsp. fresh ground nutmeg
pinch of salt
fresh ground black pepper to taste
2 cups roasted or cooked vegetables
Grape tomatoes or roasted red pepper for garnish (olives would work, too)
Extra virgin olive oil to drizzle or spray

Preheat the oven to 375ºF. Oil an oven-to-table 9" square baking dish. In a medium bowl, mix the ricotta, the eggs, the feta, and the herbs and spices through the black pepper. Mix well. Spread half the ricotta mixture evenly over the bottom of the prepared baking dish. Layer the cooked vegetables over the ricotta mixture. Top with the remaining ricotta mixture. This is easiest to do if you put little dollops all over the top, and then gently  even it out. Decorate the top with halved grape tomatoes, cut side up, or bits of roasted pepper. Drizzle or spray the whole top with a light coating of oil (Love my EVO oil sprayer for this) and place in the oven. Bake about 35 minutes until the top is browned and the cheese is puffy. Serve warm or at room temp. Serves 6. Maybe. It should, but not likely.


Friday, May 9, 2014

Fee, Fie, Foe, Friday: Grief is a Strange Grey Bird

I know my Friday rants have been more about food related topics. Life on the food chain isn't an easy thing. You are either the Eater or the Eaten. Some days I seem to have eaten the grief and it is tucked way down; others, it just eats me up. Just lands on me. Grief is a strange grey bird that seems to flutter in and out at will.

Part of this morning was spent finally clearing out my winter clothes and organizing drawers. I'm using Chuck's chest of drawers. Mine takes up more room, yet has less usable space, so it’s going off to charity. His ashes sit on top, still in the box from the crematory. His daughters and I haven't divvied them up yet, and while I know it's just ashes, I seem to want to keep them near me, as if some magic is going to conjure him up again, like adding water to a box of instant mix.


I don't get it, I've just decided to roll with it. I don’t think I really have a choice. If that dark bird has to sit on my shoulder every now and then, so be it. I hope, at some point to teach it to sing. But I know it'll never be caged or ever really fly away.


French Silk Pie for every birthday. Forever.


Wednesday, May 7, 2014

Pickled Broccoli Stalks with Ginger & Red Onion

Some days, when I'm not feeling particularly flush, the price of fresh vegetables I buy just astounds me. I buy organic, for both my health, and because I feel we vote with our dollars even more than our actual votes. But the price of a head of organic broccoli set me back on my heels a bit last Saturday. OK, granted, it was at Whole Foods, and for whatever reason, their organic produce is more expensive, for the most part than it is at my local Wegmans, but I was there for something else, so I bought it. I was thoroughly wishing my garden was producing at top speed. 

After using the top third of the broccoli head in a recipe, I put the big stems back in the fridge, figuring at the price, I'd peel them for a stir-fry. Busy week, no stir fry. As I was cleaning the crisper out for a "Scrap Salad" for lunch, I figured, I should do something with the broccoli stems that would be good, really good. Love them pickled. But as I reached for my usual Mediterranean seasonings, I took a turn East.

There were more but I ate 4 pieces trying to take a picture...

Pickled Broccoli Stalks with Ginger  & Red Onion

Four (4) thick broccoli stems, florets used elsewhere
1/3 cup red onion, in  1/4" slices
3/4 cup rice wine vinegar
3/4 cup water
3T organic sugar
3 garlic cloves, minced
2" fresh garlic, peeled and minced
1T coriander seed
3T kosher salt
1 pinch red pepper flakes


Peel the broccoli stems and cut into 2" long x 14" thick sticks. Bring a small pot of hot water to the boil and blanch the broccoli stems for 3-4 minutes until just barely tender. Drain well, and place in a heat-proof bowl. Add the raw onion to the hot broccoli and stir.

Bring the remaining ingredients to a boil in a small saucepan, and stir until the salt and sugar have dissolves. Remove from the heat, cover and let stand for 5 minutes off the heat.

Pour the seasoned brine over the broccoli and onions, and let stand 15 -20 minutes until cooled to warm, and then cover and chill. Best served chilled, and even better each day late. keeps about a week, though you'll eat it all before that...for sure.


Monday, May 5, 2014

A Random Monday Thought About Nourishing

While I can offer no other reason than not having internet access for more than 24 hours, thanks to my internet provider, for not posting every day so far in May, can I say that so many things can nourish us? Generally I think about food as nourishment, but in the last few days I've been nourished by so many people and occurrences that aren't edible, and a couple that are.

I am grateful and my heart is nourished by these:

A few days after my husband died, I was finding money everywhere: in the street, in a snowbank, in a parking lot, on the sidewalk. I think it was a message from him about abundance. Yesterday when I was feeling especially grumbly about how expensive all the errands I'd run that day had been, I found a quarter on the ground. Heads up. Another message. Thank you, sweetheart.

While I was walking my dog last week, my stepdaughter Susan was passing by on her way from a meeting, and pulled over just to give me a hug. Right when I needed it.

Worked with two friends today, Char and Brigitta, and something pretty silly made us laugh until we wept. Laughed until our sides hurt. Made the day. Good.

Got home from work, and my friend John, who is staying with me and helping sort out our clutter and my cluttered life, had a  delicious hot dinner ready.

Got my summer clothes out of storage and all my pants from last summer still fit. One bad thing, though: space bags, no matter how carefully you fold your clothes, wrinkle the daylights out of everything.

My friend Steve got me to read Haruki Murakami by sending me two ebooks. Life looks a tad different now. Better.

That Amy, Betty and Barbara listen to me whine every day and still love me. The best friends ever.

That the folks over at Comcast have finally seen fit to replace my router and modem, and the wire from my home to the pole AFTER I have lost service lasting more than 24 hours four times in three months. Small thing to be grateful for, but there it is.

And I am happy that even though it is Cinco de Mayo, I feel no compunction to write a blog post about it, or eat Mexican food, though I do love it.

And finally I am grateful that when my poor little dog felt sick, he graciously tossed his cookies on a doormat that I hated on the porch, saving me any guilt about throwing it out.


Thursday, May 1, 2014

Baking Hack Redux: Coconut Layer Cake with Fluffy Coconut Frosting

This is a rerun. A very, very good rerun. This cake is wonderful. But still a rerun, and I have a reasonably good excuse: I haven't been posting in quite a while because my sweet, brave husband died much sooner than expected from pancreatic cancer back in late February. Been a very hard couple of months. I have lost my blogging mojo; I have lost my zest for many things, but I am putting one foot in front of the other, and really want to get back to cooking and blogging. So I thought it would be a great idea to sign myself up for BlogHer's May challenge to post to my blog every day in May. The topic we're writing around...and on, is "Nourish". Because if anything, this blog nourishes me  in so many ways, and I hope it does you, too. Holy Crap. What was I thinking. Of course I totally forgot until just now, and it's May 1st at 7 PM. So, here I am whomping up an oldie but goodie, and will get myself in gear earlier tomorrow. Promise.  Luckily this cake is SO good, I feel no guilt whatsoever.


Cake Hack: Coconut Layer Cake with Fluffy Coconut Frosting
I will admit, that one of the best coconut layer cakes I ever ate was from Joanne Chang's"Flour: Spectacular Recipes from Boston's Flour Bakery + Cafe". I will also admit that while delicious, it is not the fastest, least messy recipe, either. In a weak moment, a few months ago, I promised my friend Matt a coconut birthday cake, completely forgetting the fact that his birthday comes when I am frantically getting the garden ready for the growing season. I had to come up with a cake that wouldn't take a half day to make since I needed some of that day to fool with raised beds and irrigation systems. It also had to be a wonderful cake since Matt is a fine cook / chef. Luckily he's no food snob, but he sure knows merely "good" from good.
Yes, I am making excuses for this cake hack. But this cake is good, really good, and as long as you don't go all food-snotty on me I'll share the recipe, because there are things like cake mix, and marshmallow fluff in it. You don't need any excuses to make it, not even a birthday. Just make it because it's Monday and you survived the weekend. Make it and hold your head high.


Coconut Layer Cake with Fluffy Coconut Frosting

For the cake:

1 16.25 oz. box white cake mix
cooking spray
1-1/4 cups canned coconut milk, full fat
1/3 cup coconut oil, melted
3 egg whites
1-1/2 tsp. natural coconut extract

For the frosting and filling:

16 oz. cream cheese, at room temperature
14 oz. tub of marshmallow fluff, minus 1/4 cup
2 tsp. natural coconut extract
1 14 oz. bag of sweetened, flaked coconut


1. Preheat the oven to 350ºF or to the temperature recommended on your cake mix box. Spray 2 round cake pans (8" or 9") with cooking spray and set aside.

2. Mix the cake according to the package directions, substituting the coconut milk for the water or other liquid, the coconut oil for the vegetable oil, and after adding the egg whites, add the coconut extract. Beat on low speed with a hand mixer until just blended. 

3. Pour the batter into the pans, dividing it evenly between them, and bake until it just springs back when touched. Use the box instructions as a guideline, but mine was done in about 30 minutes. cool in the pans for 10 minutes, and then turn the cakes onto a rack to cool completely

4. When the cake has cooled completely, place the softened cream cheese into a medium mixing bowl, and with an electric hand mixer whip the cream cheese until fluffy. Add the coconut extract, and then gradually add the marshmallow fluff a few spoonfuls at a time until the frosting is of a spreadable consistency.

5. Remove about 2 cups of the frosting to another container, and mix in 1 cup of the flaked coconut. This is the filling for between the layers. Cover both bowls and chill for about an hour.

6. Set one cake layer, domed side down on a cake plate and spread the filling evenly over the top. Place the second layer, flat side down on the filling and covert the cake with the frosting. Once the cake is completely iced, carefully press palmfuls of flaked coconut around the sides of the cake...feel free to do the top, too, if you wish. Store covered at room temperature for up to 24 hours, or or covered and refrigerated for up to 3 day, although it won't last that long. Serves 8 more or less...

Monday, February 3, 2014

Simple Homemade Teriyaki Sauce & A Hack Dipping Sauce

Yep, this is a partial repost. And yes, I know, the big chicken wing weekend just ended. But this is actually about a sauce that would be good on just about anything, like Asian dumplings, cooked shrimp, steamed vegetables, so read on.

Yesterday I made those wonderful, crispy oven- baked chicken wings that Food52 featured last week as a genius recipe: Ideas in Food's Korean-Style Chicken Wings. It was actually my 3rd batch. The first I made with some big-name wings from my local grocery store, and the wings were so big and fleshy that I had to cook them much longer to get a crispy finish. Make them, but if you can get smaller, free-range chicken wings, use them.  I got some for my last two subsequent batches and they are far better, and the chicken actually tastes like chicken. 

My own Simple teriyaki sauce is my go-to Asian type marinade /dipping when I'm hurrying to get something on the table.  Now, first about those wings: Fabulous. Crispy, crunchy, lick your fingers searching for every last morsel. The seasoning is perfect.   But I was running out of time, and I didn't have the Korean pepper called for in the recipe. So I hacked a sauce:

From the recipe below:

Hacked Asian Dipping Sauce

Leave out the sherry.
Add 1 Tablespoon of toasted sesame oil
Add 1 Tablespoon each of fresh garlic and ginger and leave out the ginger powder
Add a teaspoon of sesame seeds if you have them
As much hot sauce as you can stand, or chili flakes
Stir and serve.
Done.

Now, on to the original...

Mystery meat with all-purpose sauce. That pretty much sums up what was on the menu at our cafeteria back when I was an undergrad. There were far, far cruder names for it, but it was basically a slab of non-denominational meat with brown stuff ladled over it. Explains why the endless fried clam strips at the local HoJo was so wildly popular. Don't make me explain what HoJo is/was. Go ask your mother.

What I have here for you is ANOTHER kind of all purpose sauce, that while it IS brown, is probably one of the most wonderful food inventions for which we can thank our friends in Japan. Teriyaki sauce is probably one of the most versatile, easy-to-prepare concoctions you can have in your kitchen arsenal. You can use it as a marinade, a sauce for dipping, in a stir-fry, or with a little oil added, a dressing.  This version is totally bastardized; there are as many versions of this as there are fish in the sea and most of them are delicious. Some recipes are quite elaborate, but this simple recipe is one I've been making for years and have marinated just about every savory food that exists in it. You can double or triple it and it keeps in the fridge just about forever. The real thing will usually have mirin in it, and will omit the garlic and ginger. Mine is closer to the bottled stuff we suburban American kids grew up eating. This past weekend, I made a double batch and marinated a flank steak, and some boneless chicken breasts. Cold teriyaki grilled chicken breast has to be the best addition to a lunch salad ever. Learn to make this and I promise you never have to have lunch at HoJo's. Unless you want to.

Teriyaki Marinated Grilled Chicken Breast. Best Lunch Ever!
Note: if you use wheat free Tamari sauce, this sauce is gluten free. If you substitute agave nectar for the honey, its vegan.

Simple Homemade Teriyaki Sauce


1/2 cup wheat-free Tamari or regular soy sauce
1/4 cup dry sherry
3T honey or agave nectar
1 garlic clove minced
1/2 teas. powdered ginger
(dash of sriracha or hot pepper sauce, optional)

Place all the ingredients in a small saucepan, mix and bring to a quick boil. Cool and use as needed. Store covered in the refrigerator. Double or triple as desired. A single recipe will marinate a single flank steak, or about 2 pounds of chicken parts.

Monday, January 27, 2014

Fat Boy's Easy Alfredo Sauce

Many, many years ago, a good friend of mine told me that my Alfredo sauce is what turned him into a fat boy. Luckily, he didn't hate me for it. And now, even though he tells me he still makes it, he's no longer a fat boy. Now he's a svelte boy. It is, however, part of his low carb diet repertoire. While he likes to drizzle its cheesy goodness it over roasted cauliflower, it's a wonderful thing over pasta, gnocchi, vegetables and is dandy with some seafood like shrimp or scallops added at the last moment, or some spinach. My Alfredo sauce is low carb, gluten free and lacto vegetarian, and will make just about everyone at the table happy.

This is so easy to make that even a non-cook can do it and ditch the glop in the jar. The only stipulation is that you choose top notch ingredients. If all you have on hand is parmesan cheese in the familiar green can, please don't even consider making this until you can pick up some real Parmesan Reggiano. And grate it yourself. There aren't a lot of ingredients in this sauce, so each one has to speak well for itself.

Fat Boy's Easy Alfredo Sauce

Fat Boy's Easy Alfredo Sauce

Makes a scant cup, about 4 servings

1 garlic clove, minced
pinch of cayenne pepper
pinch of fresh grated nutmeg
big pinch of salt
2T unsalted butter
1 cup heavy cream, not ultra pasteurized
1/4 cup dry white wine or white vermouth
1 scant cup freshly grated Parmesan Reggiano
1/4 cup minced fresh parsley
(handful of peeled raw shrimp, optional)
extra Parmesan to pass at the table

1. In a medium to large, broad saucepan, add the garlic, cayenne, nutmeg, salt, butter, heavy cream and wine, and bring to a low boil, whisking, to keep it from boiling over. Use a saucepan bigger than you think you need. Cook the cream mixture until it is reduced to roughly half.

2. Gradually add the the Parmesan, about 1/3 at a time, whisking the sauce smooth before adding the next portion. Keep the mixture at a low simmer. If you are adding shrimp, add it now, and stir until they become pink and opaque. Stir in the parsley and serve.

Note: This Alfredo Sauce will thicken as it stands and cools, but heating and / or a splash of white wine will bring it back to sauce consistency.


Monday, January 20, 2014

Creamy Sweet Potato, Kale and Smoked Turkey Soup

I have been gone from around here for nearly two months, and I'm sorry if you all came looking and I wasn't here. My husband was diagnosed with cancer beck in November and it has changed everything. Everything. More time spent in hospitals, and OR waiting rooms. I miss you. I've missed writing this blog, and especially, I've missed cooking. But since his ability to eat much is limited right now, cooking has taken a back seat to simple snacks like stewed fruit, grilled cheese and the occasional bowl of cereal. Not particularly interesting for a food blog.

A few weeks ago I had a lot of meals in the hospital cafeteria; while there are plenty of restaurants around Jefferson University Hospital in Philadelphia, the weather was mostly in the single digits during the daytime, and only a crazy woman would venture out. I'm crazy, but not that kind of crazy. One day, after some sad and disappointing news from the surgeon, I went down to the cafeteria to drown my sorrows in soup.

They have pretty good food at Jeff; if you don't think so, you should try the dismal stuff they have at our local community hospital cafeteria, if you can ever find it open. Did I mention I've spent an awful amount of time hanging around hospitals? Anyway, the soup of the day was billed as Sweet Potato and Smoked Turkey Soup. Smelled wonderful and the color was gorgeous. The sweet potatoes were pureed into a creamy soup, and there were enough bits of smoky turkey and vegetables to keep it interesting. Soothing, satisfying and warming.  Good enough to know I could make a still better version. So here it is.

Please try to use organic vegetables in this if possible. More love in them. Fewer carcinogens, hopefully.  The easiest way to puree this soup is with an immersion blender. I use a Bamix. I've blown out practically every other brand until I got this Bamix. They invented the immersion blender, and they're made in Switzerland. Mine has lasted 8 years so far...Oh, and if you don't eat that piece of bread I have on the side of my bowl there, this soup is Paleo, dairy free, grain free, and gluten free, as long as your curry powder is gluten free. If you do dairy, a dollop of Greek yogurt, or sour cream on top would be nice.

Soothing creamy sweet potato, kale and smoked turkey soup.

Beautiful Creamy Sweet Potato, Kale and Smoked Turkey Soup

Two smoked turkey drumsticks (naturally smoked, free range if possible)
1 peeled large onion, studded with a single whole clove
1 bay leaf
1 large peeled carrot, sliced thick
1 large celery stalk, coarsely chopped
1 garlic clove, peeled
water
2 lb. sweet potatoes or orange yams, peeled and sliced into rounds
1 Tbsp curry powder, sweet or hot as desired
1 small bunch of Lacinato (Dinosaur) kale, sliced into ribbons (about 4 cups, packed)
salt and pepper to taste

1. Place the turkey drumsticks, the onion studded with the clove,  bay leaf, carrot, onion garlic and celery into a deep soup pot and fill with water until everything is covered by about 2" to3". Will probably be about 3 quarts of water. Bring to a boil, turn down to medium heat, partially cover and let simmer until the turkey is about to fall off the bone, about 45 minutes.

2. Remove the turkey, and set aside to cool. Remove the bay leaf, and the onion from the smoky stock. Remove the clove from the onion and discard the clove. Toss the onion back into the stock, along with the sweet potatoes, and the curry powder. Bring back to a boil, uncovered, and cook about 30 minutes, or until the sweet potatoes are falling apart tender.

3. Puree your soup smooth in the pot with your immersion blender (or carefully in a regular blender); you should have about 1-1/2 quarts of pureed soup. Shred the turkey meat into bite sized bits, and add it, plus the kale to the pureed soup. Simmer about 15 minutes until the kale is tender and the flavors meld. Taste for salt and pepper, then serve.

Makes about 6 hearty servings.


Monday, December 9, 2013

Retro Meaty Monday: Beef Brisket with Chili Sauce, Onion Soup & Beer

Another repost: we are actually going to have this for dinner tonight. But being a retail manager, I worked yesterday, drove home in snow, and am leaving too early this morning, after shoveling. Thank heavens I put this in the oven yesterday, cause I'll need a hearty dinner tonight. Careful, please, if it is icy where you are as it is here.

Since last September, I've been moving a 9 lb. brisket from one side of my big freezer to the other to make room for other stuff. It was such a good deal, on sale for the Jewish holiday, that I had to have one. My original plan was to cut it into two pieces, since unless I get what's called a "Packer Cut" brisket to smoke,  a big brisket is too much meat for a family of two. But it was already cryovac packaged and I just didn't want to break it open, so I froze it whole. It was time to cook it and freeze the leftovers.  

Last week I was shuffling through my Mom's recipe file that I inherited. I was looking for a blueberry muffin recipe that she made at least once a month, when I discovered three braised brisket recipes in there. Now here's the thing. My mother never once made a brisket. Sure, Mom boiled a corned beef brisket around St. Patrick's Day, but even then it was more likely to be ham and cabbage than corned beef. My Aunt May, who was actually my step-grandmother, was German Jewish and she managed to get me to eat things my Italian Catholic family never cooked. Like brisket. It was great. Everyone was always trying to fatten me up, indeed, I didn't tip the scales at over 100 lb. until I was past 35. She was a terrific  baker, and I would always stuff my mouth and my pockets with the cookies she made, but they were withheld until I ate some "real food" like ...brisket. It was wonderful

I've made a few braised briskets in my time, and smoked quite a few big boys. But  I have never tried the recipes that use onion soup mix, and liquids like barbecue sauce or ketchup in a braise. Always used lots of onions, wine, and other typical braised beef ingredients. So imagine my shock when I found a recipe using ketchup and onion soup mix in Aunt May's handwriting in Mom's recipe box, and scribbled along the edge in my father's unmistakable hand --"Judy's favorite".  

After Googling, I found that there are hundreds of brisket recipes on the web using some variation of Aunt May's onion soup recipe for brisket. Aunt May was on to something. Back in the mid-1960s,  adding processed convenience foods to recipes was considered innovative, and modern, as so many of these foods were new. Now that so many processed foods are on our "foodie shit list," a lot of people write them off, at best, as quaint, retro, mediocre recipes.  This is wrong.  Dumping a packet of onion soup mix over the roast was as au courant as making a recipe from Modernist Cuisine is today. It was called "Progress".

We come, no matter what anyone says about American cooking, from an enormous group of fine home cooks who cared about what was put on the table, and often had to do the best with what was on hand. If they hadn't, we likely wouldn't be here. Like it or not, many of these old recipes are a product of their time, and are part of our collective heritage.  They're still delicious, and deserve to grace your table from time to time. Aunt May's version has ketchup, onion soup and water in it; nothing more.  I have, of course, doodled this up a bit, and it's delish. I think my Aunt would call this Progress, too. 
Not picture perfect, but still perfect brisket.
Note: I happened to have an extremely large brisket. A more normal size brisket is about 7 pounds, and if you want to use a 4 pound piece, use half the amount of chili sauce, half the beer (drink the rest), 2 Tablespoons of molasses and half the garlic. Keep everything else the same. This needs to cook all day, and is much better chilled, sliced and then reheated on the next day in the abundant sauce, so plan accordingly. Freezes well.

Retro Braised Brisket

Serves 10

Ingredients:

1 7 to 8 lb. beef brisket, flat cut, with a 1/4"  fat cap
2  12 oz. bottle chili sauce or ketchup
1 packet onion soup mix
1/4 cup blackstrap molasses

1/2 tsp. Marmite (opt.)
2 tsp. coarsely ground black pepper
1 bottle lager beer or dark beer or stout

12 garlic cloves, peeled (about 1 head)
3 - 4 bay leaves
Salt when reheating if needed

Just needs some foil to cover the pan, and then it's cook time!
Instructions:

1. Preheat the oven to 275ºF. Mix everything through the black pepper in a medium bowl with a  whisk. Then mix in the beer.

2. Place the meat fat side down in a roasting pan, that just fits it, scatter the garlic and bay leaves over the meat, and pour the beer  mixture over the top. Flip the meat so the fat is up.

3. Cover the pan tightly with foil, and place in the oven. Roast about 3 - 4 hours, then uncover and carefully turn the meat. recover and cook another 2 to 3 hours until the meat is fork tender.

4. Cool the meat in the sauce, then remove and wrap separately. Chill the meat and sauce. When ready to serve, remove the congealed fat from the sauce, slice the meat in 1/4 to 1/2 inch slices and reheat in the sauce, either in the oven or on top of the stove.